 English
 العربية
 Deutsch
 Español
 Français
 Italiano
 Português
 Русский
 Türkçe
 Tiếng Việt
Image Compressor: How to Reduce Image Size Without Losing Quality
Images make up more than 50% of the average web page's total weight. That means every time someone visits your website, their browser is downloading megabytes of visual content before they even read a single word. If those images are not properly optimized, you are unknowingly driving away visitors, hurting your search rankings, and wasting expensive server bandwidth.
This is exactly where an image compressor becomes your most powerful tool. Whether you are a blogger uploading hero images, an e-commerce store owner managing thousands of product photos, or a developer building the next big web application, understanding how to compress images online without sacrificing visual quality is no longer optional — it is essential.
If you are new to the concept of web performance optimization, our complete website speed guide provides a broader foundation. For now, this comprehensive article walks you through everything you need to know about image compression in 2025, from the underlying technology to practical step-by-step methods that deliver real results.
What Is Image Compression and Why Does It Matter?
Image compression is the process of reducing the file size of a digital image while preserving as much of its visual quality as possible. Think of it like packing a suitcase: you are removing the empty, unnecessary space so everything fits more efficiently without damaging what is inside.
There are two fundamental types of image compression that every professional should understand:
Lossy compression permanently removes certain image data to achieve smaller file sizes. Formats like JPEG use this method. The removed data is typically color information or fine details that the human eye can barely detect. Once compressed with lossy methods, the original image cannot be fully restored. To dive deeper into how different formats handle this, read our detailed breakdown on image file formats explained.
Lossless compression reduces file size without discarding any pixel data. Formats like PNG and WebP (in lossless mode) use this approach. The file size reduction is generally smaller compared to lossy compression, but every single detail of the original image remains perfectly intact. If your workflow involves logos, graphics, or text-heavy visuals, our PNG compression guide covers the specific techniques that work best for these file types.
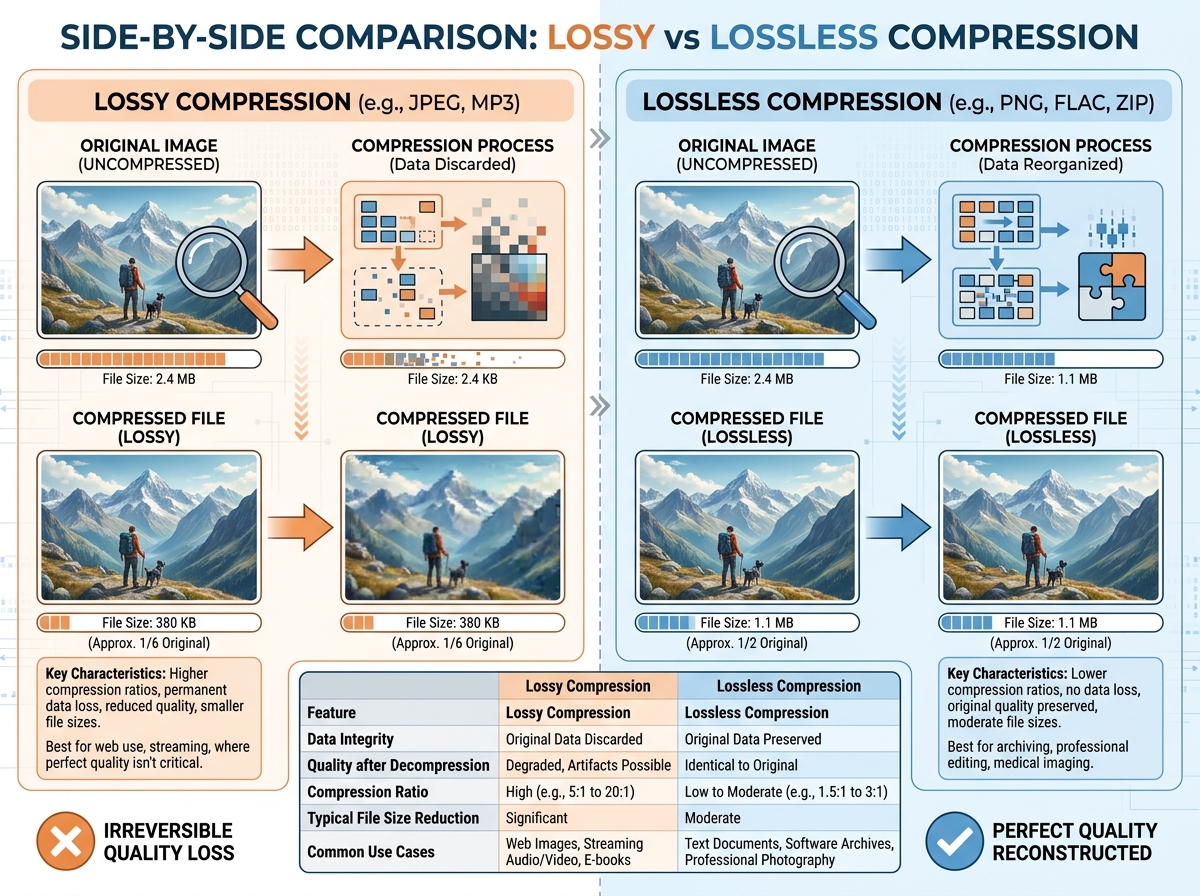
Understanding the difference between these two methods is the foundation of every smart image optimization strategy. Choosing the wrong type at the wrong time can either bloat your page or destroy your image quality.
How Large Uncompressed Images Destroy Your Website Performance
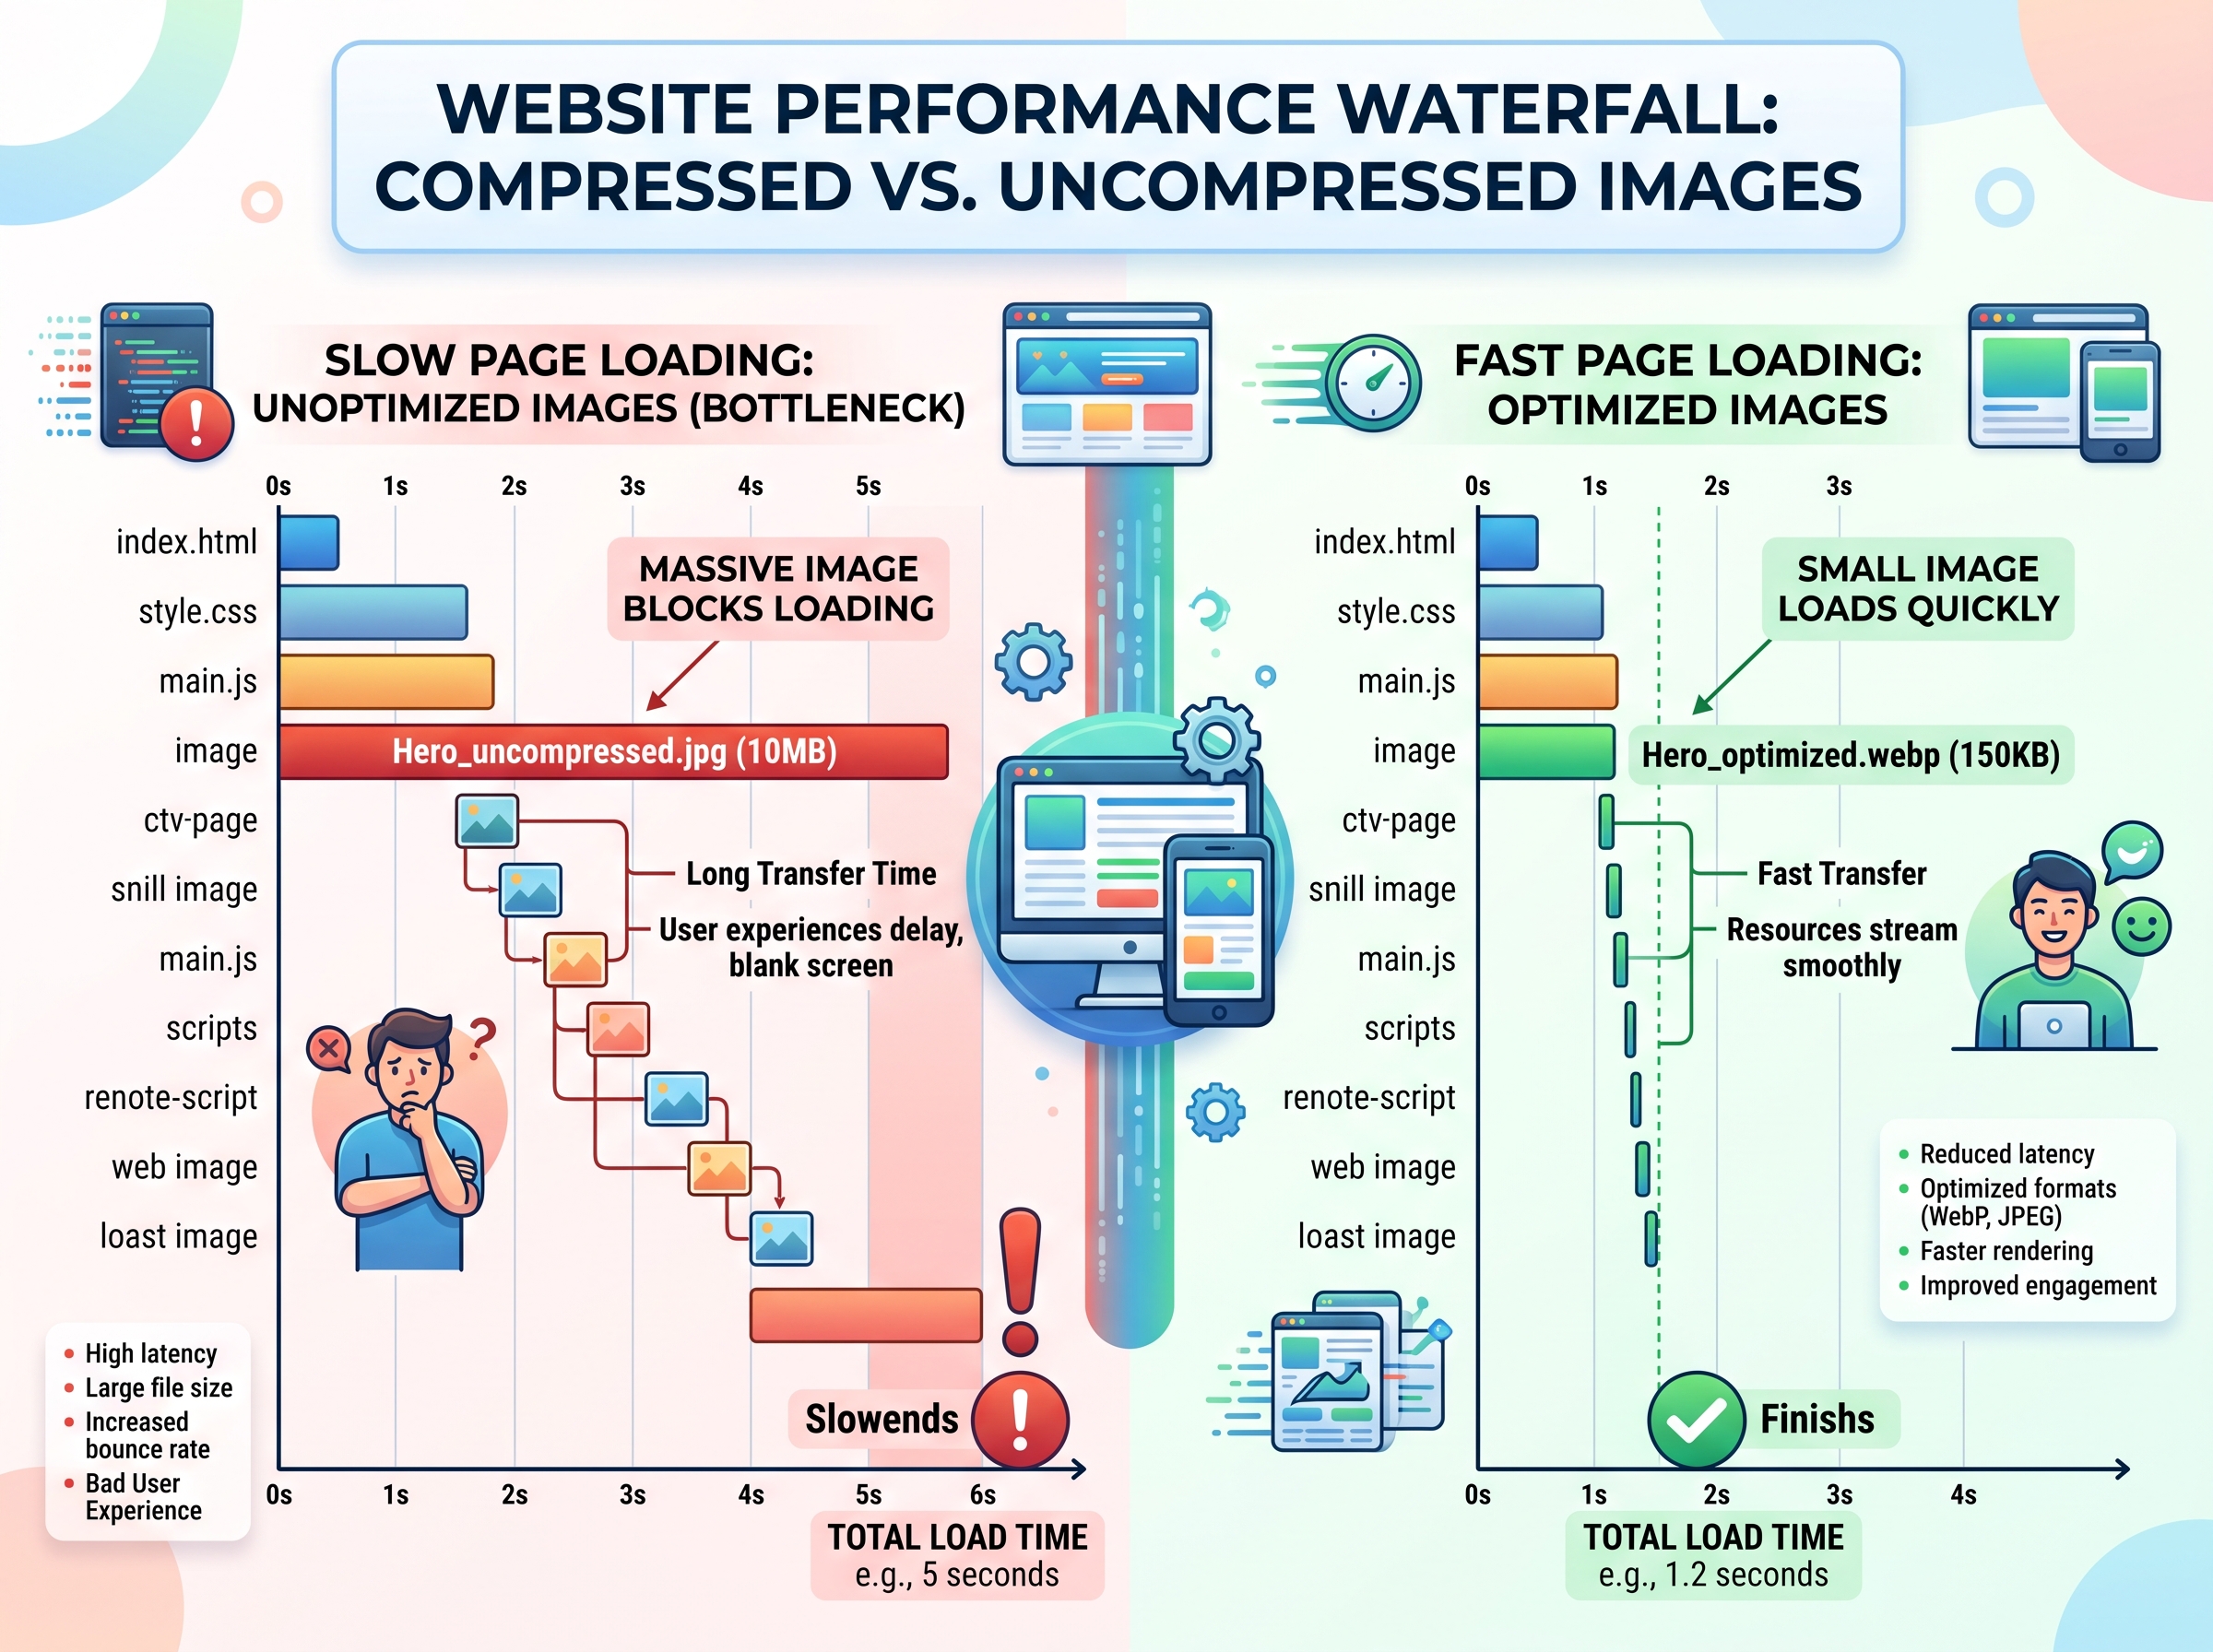
Many website owners dramatically underestimate the impact of unoptimized images. The consequences extend far beyond slightly slower page loads. Here is what actually happens when you upload large, uncompressed images to your website:
Poor User Experience: Research from Google shows that 53% of mobile users abandon a site that takes longer than 3 seconds to load. Large images are consistently the number one cause of slow load times. Every extra second of loading time directly translates to lost visitors and lost revenue. For a deeper look at how page speed affects conversions, check our article on how website speed impacts your bottom line.
Lower Search Engine Rankings: Since 2018, Google has used page speed as a direct ranking factor in its mobile-first indexing. The search giant explicitly rewards faster websites with higher positions in search results. Unoptimized images are essentially handing your competitors free ranking points. If you want to understand the full picture, our SEO and image optimization guide connects the dots between compression and search visibility.
Increased Bounce Rates: When visitors encounter slow-loading pages, they do not wait. They click the back button and visit the next result. High bounce rates signal to Google that your page does not satisfy user intent, further damaging your search visibility.
Wasted Bandwidth and Hosting Costs: If your site serves 100,000 page views per month and each page contains 5MB of unoptimized images, you are transferring 500GB of data monthly. Compressing those images by 70% would save you 350GB in bandwidth — a significant reduction in hosting costs, especially for cloud-based or CDN-powered setups. Learn more about managing these costs in our bandwidth optimization strategies article.
The Best Tools to Compress Images Online in 2025
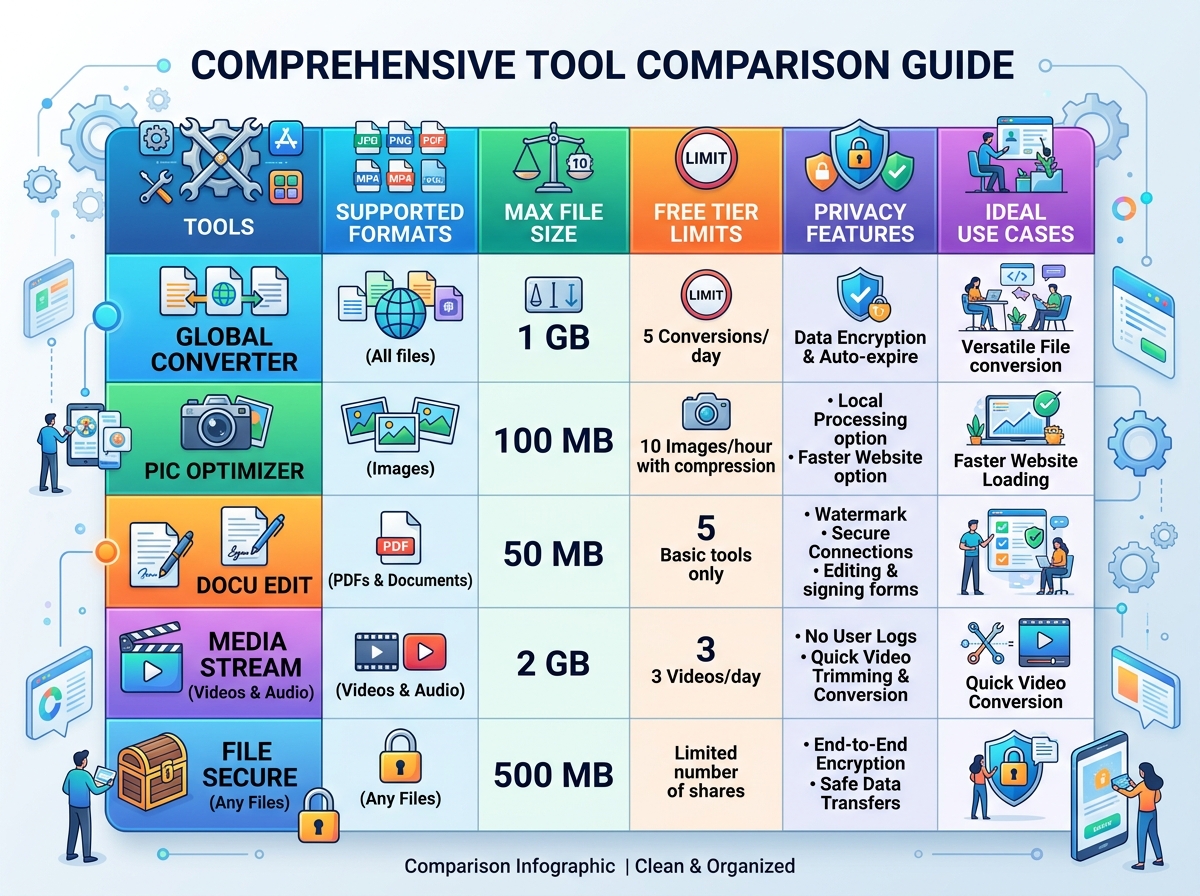
The market is filled with image compression solutions, but not all tools are created equal. Here are the most reliable and effective options available today:
Okemall Image Compressor
Okemall Image Compressor offers a clean, browser-based interface that allows you to compress multiple images simultaneously without installing any software. It supports JPEG, PNG, and WebP formats with adjustable compression levels. The tool processes everything locally in your browser, meaning your images never leave your device — a critical feature for professionals handling sensitive or client-owned photography. If you need to handle large batches at once, our bulk image compressor tool is built specifically for that workflow.
TinyPNG
TinyPNG has been an industry staple for years. It uses smart lossy compression techniques to reduce PNG and JPEG file sizes significantly. The free tier allows up to 20 images at a time with a maximum of 5MB per image, making it suitable for casual use but limited for bulk operations.
Squoosh
Developed by Google's Chrome Labs team, Squoosh provides an interactive interface where you can compare different compression algorithms side by side in real time. It supports next-generation formats like WebP, AVIF, and MozJPEG, making it an excellent tool for developers who want fine-grained control over output quality. For a direct format conversion workflow, try our JPEG to WebP converter for a streamlined experience.
ImageOptim (Desktop)
For Mac users, ImageOptim remains one of the best desktop-based solutions. It strips unnecessary metadata and applies optimal compression without any quality loss. It integrates seamlessly into workflows where batch processing of hundreds of images is required. Windows users can explore our roundup of best desktop image optimization software for platform-specific recommendations.
Step-by-Step: How to Compress Images Without Losing Quality
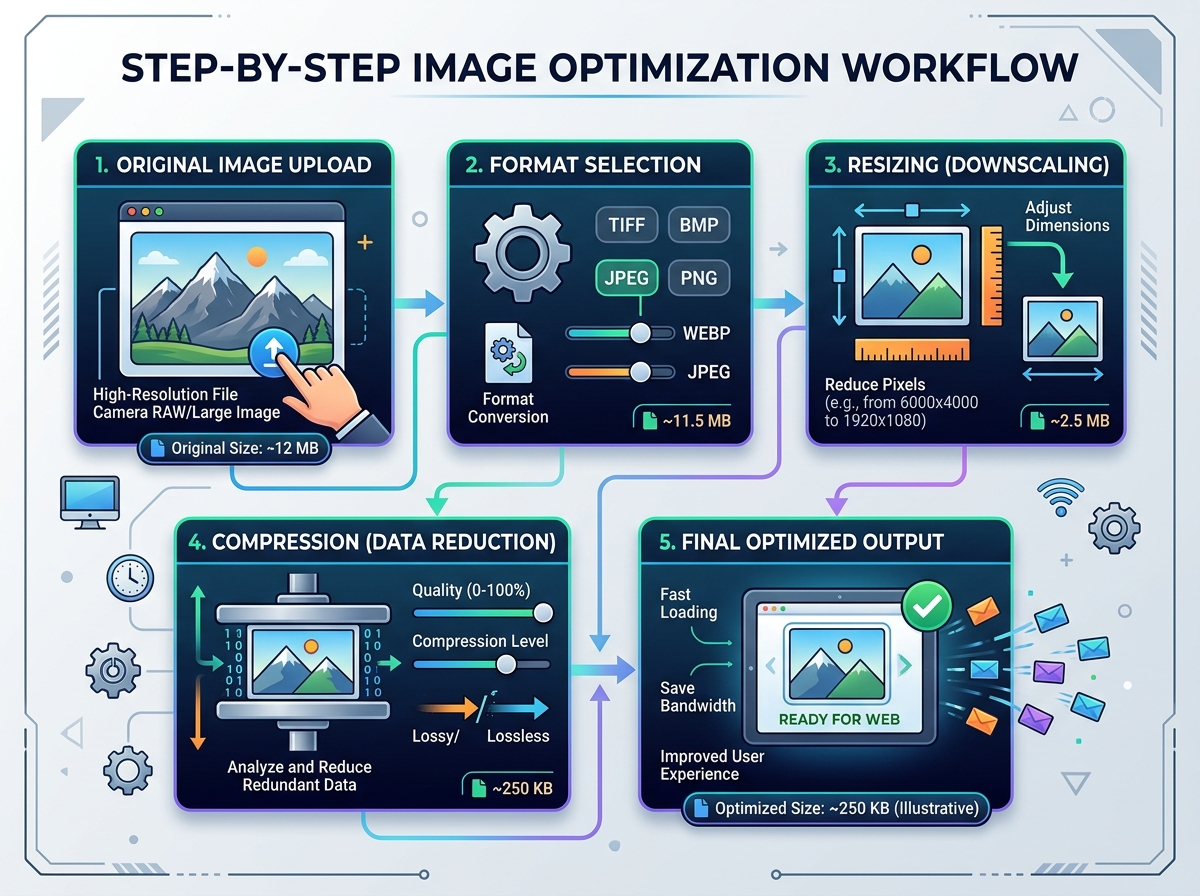
Achieving the perfect balance between file size and visual quality requires a methodical approach. Follow this proven workflow to get the best results every time:
Step 1: Choose the Right Format Before Compressing
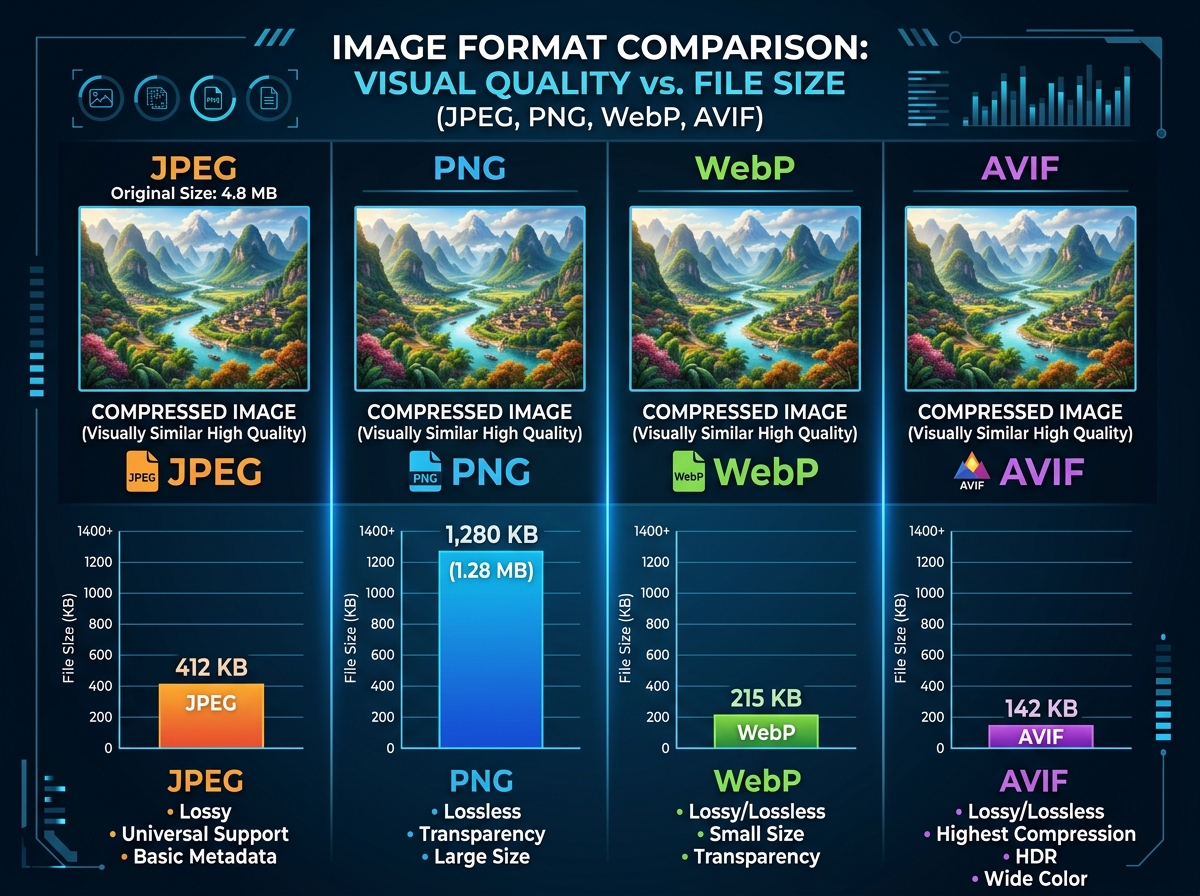
Format selection is your first and most important decision. Use JPEG for photographs and complex images with many colors. Use PNG for images that require transparency, sharp edges, or text overlays. Use WebP whenever possible — it provides 25-35% smaller file sizes than JPEG at equivalent quality levels and is now supported by over 97% of browsers worldwide. Our WebP conversion guide walks you through the entire process of making the switch.
Step 2: Resize Images to Their Display Dimensions
This is the single most overlooked step in image optimization. If you upload a 4000×3000 pixel photograph but display it at 800×600 pixels on your page, you are forcing every visitor to download 6 times more data than necessary. Always resize your images to match their maximum display dimensions before compressing. Use our free image resizer tool to handle this step quickly and accurately.
Step 3: Apply the Appropriate Compression Level
Start with a medium compression setting (around 70-80% quality for JPEG) and visually compare the result with the original. If the difference is imperceptible, try pushing the compression further. If you notice artifacts, pull back slightly. The goal is to find the sweet spot where file size is minimized but quality remains acceptable. Our guide on finding the ideal JPEG quality setting provides visual examples at every level from 10% to 100%.
Step 4: Strip Unnecessary Metadata
Images often contain embedded metadata such as camera model, GPS location, date taken, and editing software information. This metadata can add 10-50KB to each file. Most compression tools automatically strip this data, but always verify if your chosen tool includes this feature. If privacy is a concern, our image metadata remover tool strips all EXIF data in one click.
Step 5: Test the Final Result in Context
Always view your compressed images in their actual environment — on the live webpage, on both desktop and mobile devices, and under different network conditions. An image that looks perfect on a large desktop monitor might reveal compression artifacts on a smaller mobile screen. For a complete testing workflow, read our image quality testing methodology article.
Understanding Next-Generation Image Formats
The future of image compression is not about squeezing more out of JPEG and PNG. It is about adopting entirely new formats designed for the modern web. If you want a complete comparison, our image format comparison chart breaks down every format by compression ratio, browser support, and use case.
WebP
Created by Google, WebP supports both lossy and lossless compression in a single format. It consistently outperforms JPEG and PNG in file size reduction while maintaining visual quality. Major platforms like YouTube, Facebook, and Shopify have already converted their entire image libraries to WebP. Ready to make the switch? Our PNG to WebP converter handles the transformation automatically.
AVIF
AVIF is the newest image format based on the AV1 video codec. It delivers approximately 20% better compression than WebP at equivalent quality levels. Browser support has grown rapidly, with Chrome, Firefox, and Edge now fully supporting it. The main limitation is encoding speed — AVIF images take significantly longer to generate. We explore the practical implications in our AVIF format deep dive.
JPEG XL
JPEG XL was designed as the direct successor to JPEG, offering 50% better compression while maintaining backward compatibility. Despite its technical promise, browser adoption has been disappointing, with major browsers declining to ship support. It remains a format to watch but not yet one to rely on. Stay updated through our web image format trends page.
Advanced Image Optimization Techniques for Professionals
Beyond basic compression, several advanced strategies can further improve your website's image performance:
Lazy Loading: This technique delays the loading of images until they are about to enter the viewport. Instead of loading all 30 images on a long page immediately, only the first 3-4 visible images load initially. The remaining images load as the user scrolls down. Modern HTML supports this natively with the loading="lazy" attribute. Our lazy loading implementation guide covers both native and JavaScript-based approaches.
Responsive Images with srcset: Different screen sizes should receive different image files. A mobile device does not need a 1920px wide hero image when it will only display at 375px. The HTML srcset attribute allows you to specify multiple image versions and let the browser choose the most appropriate one. Learn the exact syntax in our responsive images tutorial.
CDN-Based Image Transformation: Content delivery networks like Cloudinary, Imgix, and Cloudflare Image Resizing can dynamically compress, resize, and convert images on-the-fly at the edge. This eliminates the need for manual optimization and ensures every visitor receives the optimal image version for their specific device and connection speed. Our CDN image optimization setup guide compares the top providers.
Caching Strategies: Proper cache headers ensure that once a visitor downloads your compressed images, their browser stores them locally. Subsequent page visits load instantly without re-downloading any image files. Set long cache expiration times (6 months to 1 year) for images that rarely change. For WordPress users, our WordPress image caching configuration article provides plugin-specific instructions.
Image Optimization for E-Commerce Websites
E-commerce sites face unique image challenges that deserve special attention. A typical product page may contain a main product image, 4-6 additional angle shots, zoom-enabled high-resolution versions, and thumbnail images for related products. That can easily exceed 3-5MB per product page before optimization.
For e-commerce specifically, we recommend using our e-commerce image optimization checklist which covers product photo standards, zoom image handling, and category page thumbnail strategies. Many store owners also benefit from our Shopify image optimization guide and WooCommerce image compression tutorial, both of which include platform-specific configuration steps.
The key principle for online stores is consistency. Every product image should follow the same compression standards, dimensions, and format. This not only improves performance but also creates a polished, professional visual experience across your entire catalog.
Image Optimization for WordPress Sites
WordPress powers over 43% of all websites, and its default image handling has historically been a major source of bloat. When you upload an image through the WordPress media library, it automatically generates multiple resized versions — but none of them are compressed or converted to modern formats by default.
To solve this, our WordPress image optimization guide recommends a combination of compression plugins, WebP auto-conversion, and lazy loading. For users who prefer a no-plugin approach, our manual WordPress image optimization tutorial shows how to configure your theme's functions file to handle compression automatically during upload.
Common Image Compression Mistakes to Avoid
Even experienced professionals sometimes fall into these traps:
Over-compressing hero images: Your hero image is the first thing visitors see. Saving 50KB on a hero image at the cost of visible quality degradation is a poor trade-off. Invest more file size budget in your most prominent visuals. Our hero image optimization tips explain how to balance impact and performance.
Compressing already-compressed images: Re-compressing a JPEG that has already been compressed introduces generation loss — each compression cycle degrades quality further. Always work from the original, uncompressed source file. This concept is explored in detail in our understanding JPEG generation loss article.
Ignoring WebP conversion opportunities: Simply compressing a JPEG to a smaller JPEG is leaving significant savings on the table. Converting that same image to WebP during compression typically yields an additional 25-35% size reduction. Our WebP vs JPEG comparison shows real-world examples of the difference.
Forgetting about thumbnail galleries: E-commerce sites often have product pages with 5-8 thumbnail images. Individually, each thumbnail might seem small, but collectively they can add up to hundreds of kilobytes. Every image on the page deserves optimization attention.
Not measuring the actual impact: Always use tools like Google PageSpeed Insights, GTmetrix, or WebPageTest before and after optimization. Quantifying your improvements helps justify the time invested and identifies remaining bottlenecks. Our website speed testing tools comparison helps you choose the right testing platform.
The Complete Image Optimization Checklist
Use this checklist every time you prepare images for your website:
- Start with the highest quality original source file
- Crop and edit the image to its final composition
- Resize to the maximum display dimensions needed on your site
- Choose the optimal format (WebP first, JPEG fallback, PNG only when necessary)
- Apply compression at 70-85% quality and visually verify the result
- Strip all unnecessary metadata (EXIF, GPS, camera info)
- Implement lazy loading for below-the-fold images
- Add responsive srcset attributes for multi-device support
- Set appropriate cache headers for long-term browser caching
- Test page load speed before and after optimization
- Verify visual quality on both desktop and mobile devices
For a printable version of this checklist along with 15 additional optimization steps, download our free image optimization checklist PDF.
Image compression is not a one-time task — it is an ongoing discipline that directly impacts your website's performance, user experience, search rankings, and operational costs. The tools available in 2025 make the process faster and more accessible than ever, but the fundamental principles remain unchanged: choose the right format, resize appropriately, compress intelligently, and always verify results in context.
Whether you use a browser-based image compressor like Okemall for quick one-off optimizations or build an automated pipeline with CDN-based transformations, the most important step is simply to start. Every unoptimized image on your website is a measurable, fixable problem. The sooner you address it, the sooner your visitors — and search engines — will reward you.
If you found this guide helpful, explore more of our image optimization resources for in-depth tutorials, tool reviews, and industry insights. And if you are looking for a quick, no-signup solution right now, head straight to our online image compressor and start optimizing in seconds.

Popular Tools
Recent Posts